
D.I.Y Wallpaper Stripping!
- JBCarpentryPlusLTD

- Jul 16, 2021
- 4 min read
Updated: Aug 20, 2021
Wallpaper stripping doesn't have to be a nightmare! With the right tools and a bit of know-how, anyone can strip wallpaper quickly and efficiently, and you might even enjoy it. It can be extremely satisfying watching the paper peel off of your walls and ceilings in nice even chunks. On the other hand, it can be VERY frustrating when it comes off inch by inch and takes all day to strip a single room! With the knowledge you gain throughout this guide, wallpaper stripping nightmares will be a thing of the past and you'll be able to strip the stickiest of wallpaper in minutes - not hours!

We'll start with a list of the tools you will need to get the job done:
Electric wallpaper steamer
Scraper
Scoring tool - optional
Old towel/rag
Masking tape
Dust sheet


First things first, prepare your work area. Peeled wallpaper will be wet, sticky, and messy, so always ensure you prep and cover the area with dust sheets to keep everything clean.
Always be aware of live electrical outlets! It may be a good idea to cut the power in the room you are removing the wallpaper from and also to use masking tape to cover outlets and switches. Cutting the power will prevent any electrical accidents, and the masking tape will prevent excess water from the steamer from seeping into your outlets and switches. A safe working environment is always important!
You may also want to use your masking tape to cover skirting and architrave or anything else that you want to avoid getting wet.
Understanding what your walls are made up of can be helpful too. Plaster is absorbent and steaming it for too long may cause water build-up. This isn't a big problem though as the plaster will dry out. Drywall, however, could cause more problems if it gets wet. You can still steam over drywall, but be much more cautious when doing so. If the drywall gets too wet, it can easily crack or chip and we don't want any unnecessary work!
Once you have prepped the area, fill your steamer to the maximum line with water. Attach the hose with the rectangular-shaped applicator on the end. Plug it in and wait for it to heat up, this usually takes around 10 minutes.
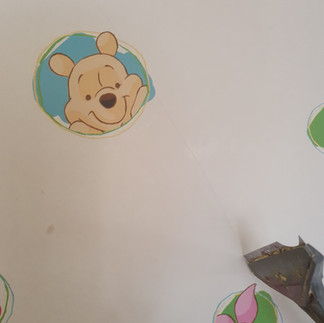
In the meantime, we will start by using the scoring tool - or the sharp corner edge of the scraper to 'score' lines into the paper. Ideally, these lines are just deep enough to penetrate the paper, but no deeper! Often, there will be a layer of backing paper underneath the visible wallpaper. This will be removed as well, so scratching through this layer is not an issue. However, we don't want to create extra work for ourselves before painting or re-applying wallpaper by leaving deep lines in the plaster or drywall underneath. These 'scores' should cross over each other to form manageable pieces that we can peel off one at a time. The sizes and shapes of these lines and pieces do not matter, all that matters is that we can penetrate as much of the surface area as possible with our steamer. The lines allow the steam to get underneath the paper in more areas, thus forcing the adhesives to break down at a much faster rate, whilst also allowing us to pull or scrape off more suitably sized pieces each time.
Once your steamer starts making noises and leaking steam, it's ready to go! Always be cautious when using a steamer, the water inside is very hot and it will burn you if you spill any on your skin! Never open the steamer's filler cap when it is hot either, as the pressure build-up could cause the boiling water inside to expel rapidly, burning everything it touches! If you are unsure about using a steamer, please seek professional advice before you attempt to use one. Used incorrectly, they can be very dangerous and can cause serious injury.
It doesn't matter where you start stripping your wall or ceiling, but ideally, start at one end or in a corner and work your way across. Place your steamer over a join in the paper, or over one of the lines we've created with the scraper. Hold the steamer still over each spot for 10-20 seconds, it needs to be held still long enough to heat and wet the paper underneath, but not for so long that water is dripping everywhere. This requires a bit of trial and error to perfect. It doesn't matter too much if you steam an area for a bit too long, that's what the old rag is for! The main problem we want to avoid is soaking the plaster or drywall underneath. As plaster is absorbent, it will soak up the water, which causes a delay as you'll have to let it dry thoroughly before painting or re-applying wallpaper. Drywall is also absorbent and can crack or chip when wet. Extra caution should be applied if you are steaming over drywall to prevent this.
Once an area is well steamed, it should scrape off like butter. Make sure to get your scraper underneath the paper at a corner or join, then push! In some cases, you might remove the top layer and leave the backing paper behind. This often happens when the top layer is well steamed, but the steam hasn't penetrated the paper underneath. If this happens, just go back over the dry backing paper with the steamer until it's loose and scrapes off easily. This goes for all the troublesome areas. The more you steam it, the easier removal will be! But always be aware of the material underneath! There should be minimal effort when scraping. If scraping feels like hard work, then stop, steam the area again, and then continue. Once you get going, and everything is steamed adequately, you might even be able to peel the majority of the paper off with just your hands.
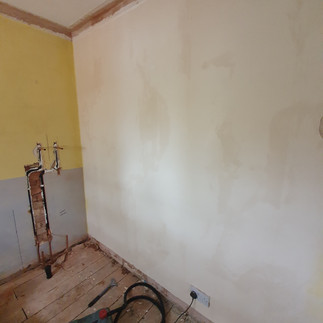
After all the paper has been removed, gently rub the wall down with your old towel. This will remove any adhesive residue and excess water. Ensure that the area is allowed to dry completely before you paint or re-apply any wallpaper.


Thank you for reading our guide to easier wallpaper removal! This guide is intended to help our readers with D.I.Y tasks at home. JB Carpentry Plus LTD takes no responsibility for the outcome of any tasks completed after using this guide. Always do your own research and consult a professional where necessary.


Comments